Table of Contents Show
Ultrasonic sensors are essential tools for anyone diving into the world of embedded systems and IoT projects. These devices use high-frequency sound waves to measure distances, making them perfect for applications like robotics, automation, and even smart parking systems. By pairing an ultrasonic sensor with an Arduino, you gain a cost-effective and flexible platform to create precise distance-measuring projects. This guide walks you through the process step by step, from understanding the sensor’s mechanics to calibrating your setup for optimal results. Whether you’re a beginner or an intermediate maker, you’ll learn how to bring your ideas to life with this powerful combination.
Step-by-Step Process
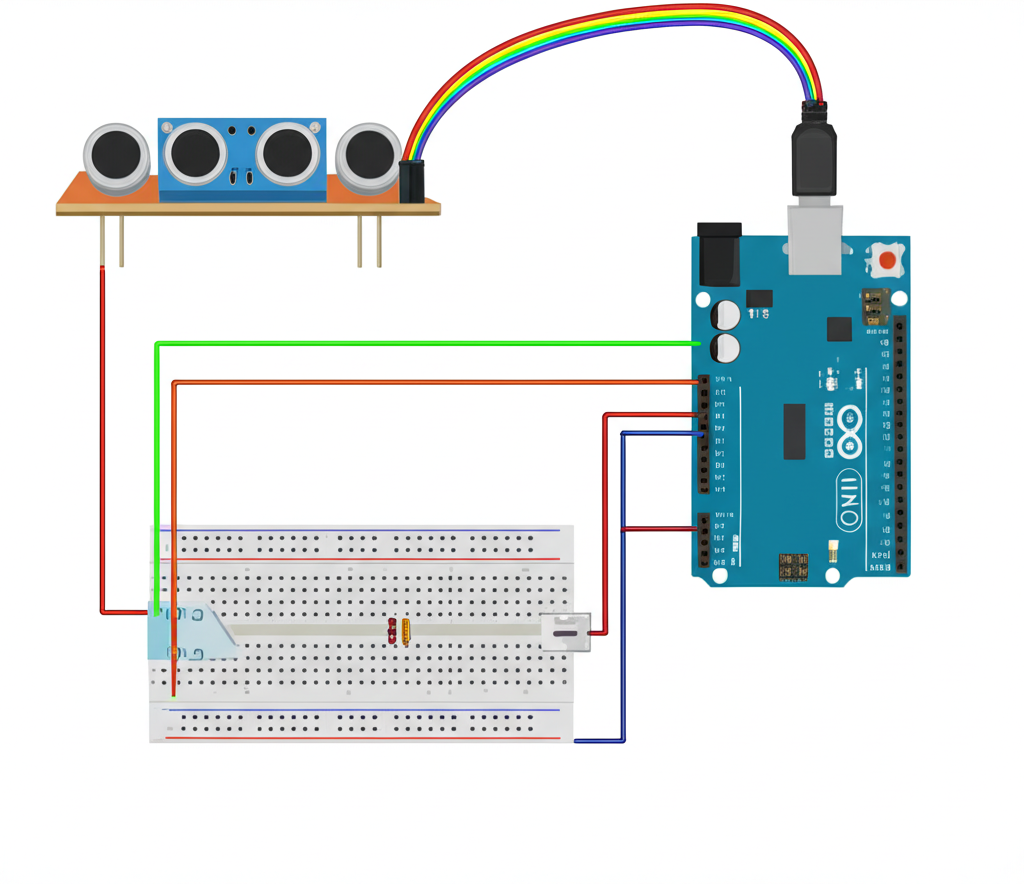
Connect Sensor Wires
Attach VCC, GND, and Echo/Trig pins to Arduino.
Upload Distance Code
Load the HC-SR04 library and sketch to Arduino.
Define Pin Connections
Set pin modes for Echo and Trigger in setup().
Measure Distance
Use pulseIn() to calculate distance from Echo pin.
Display Results
Print distance in cm to Serial Monitor.
Process infographic for How to Use Ultrasonic Sensor with Arduino for Distance Measurement
Understanding Ultrasonic Sensors
What is an Ultrasonic Sensor?
An ultrasonic sensor emits high-frequency sound waves (above 20 kHz) to detect objects and measure distances. It consists of two main components: a transmitter that sends out ultrasonic pulses and a receiver that captures the echoes. When the emitted sound bounces off an object and returns, the sensor calculates the distance based on the time elapsed. Common models like the HC-SR04 and JSN-SR04T are widely used due to their affordability and ease of integration with microcontrollers.
How Ultrasonic Sensors Measure Distance
The distance-measuring process involves three key steps. First, the sensor sends a short ultrasonic pulse through the transmitter. Second, the pulse travels until it hits an object, then reflects back to the receiver. Finally, the microcontroller calculates the distance using the formula: distance = (duration * speedofsound) / 2, where duration is the time taken for the echo to return. The speed of sound in air is approximately 343 m/s, but this value can vary slightly with temperature. Accuracy may be affected by factors like object angle, surface material, and environmental conditions such as humidity or obstructions.
Components Required
Hardware Components
- Arduino board (Uno, Nano, or similar)
- Ultrasonic sensor (HC-SR04 is recommended for beginners)
- Breadboard and jumper wires for prototyping
- Power supply via USB or an external source
Software Requirements
- Arduino IDE (ensure it’s downloaded and installed)
- No external libraries required for basic HC-SR04 functionality
- Basic understanding of loops, variables, and timing functions in Arduino programming
Wiring the Ultrasonic Sensor to Arduino
Pin Configuration
The HC-SR04 sensor has four pins: VCC (5V power), GND (ground), Trig (trigger for emitting pulses), and Echo (receiving the echo). Connect VCC to the Arduino’s 5V pin, GND to a ground pin, Trig to a digital pin (e.g., pin 9), and Echo to another digital pin (e.g., pin 10). A simple breadboard layout with labeled connections ensures a clear setup. Always double-check wiring to avoid short circuits.
Troubleshooting Common Wiring Issues
If the sensor fails to work, inspect for incorrect voltage supply (it requires exactly 5V). Loose or misconnected jumper wires can prevent proper signal transmission, so verify all connections. Grounding problems, such as using separate power supplies without a common ground, can also disrupt readings. Ensure the Arduino and sensor share a stable ground reference.
Writing the Arduino Code for Distance Measurement
Basic Code Structure
Begin by defining the Trig and Echo pins in your Arduino sketch. Use pinMode() to set Trig as an output and Echo as an input. Emit a 10-microsecond pulse on the Trig pin to trigger the sensor, then read the Echo pin’s response with pulseIn(). Convert the duration to centimeters or inches using the speed of sound formula. Incorporate delays in the loop to stabilize measurements and avoid overwhelming the sensor.
Example Code with Explanation
// HC-SR04 pins
const int trigPin = 9;
const int echoPin = 10;
void setup() { pinMode(trigPin, OUTPUT); pinMode(echoPin, INPUT); Serial.begin(9600); }
void loop() { digitalWrite(trigPin, LOW); delayMicroseconds(2); digitalWrite(trigPin, HIGH); delayMicroseconds(10); digitalWrite(trigPin, LOW);
long duration = pulseIn(echoPin, HIGH, 30000); // 30ms timeout float distanceCm = (duration * 0.0343) / 2; float distanceIn = distanceCm / 2.54;
Serial.print("Distance (cm): "); Serial.println(distanceCm); Serial.print("Distance (in): "); Serial.println(distanceIn); delay(1000); }This code initializes the pins, sends a trigger pulse, calculates the distance in centimeters and inches, and prints the result to the serial monitor. Adjust the trig and echo pin numbers if using different connections. For inches, simply replace the 0.0343 with 0.01715 to simplify the conversion.
Advanced Modifications
Enhance functionality by adding an LED or buzzer that activates when an object is within a specific range. For real-time data, interface the sensor with an LCD display to show measurements on-screen. Calibration improves accuracy by adjusting the speed of sound variable based on ambient temperature or applying an offset to account for sensor tolerances.

Testing and Calibration
Testing the Sensor
To verify your setup, place an object at a known distance (e.g., 30 cm) and check if the serial monitor outputs a close value. If readings are erratic or zero, review your wiring and ensure the Echo pin isn’t left floating. A timeout value in the pulseIn() function prevents infinite waits. Common errors include missing obstacles in the sensor’s path or using non-reflective materials, which weaken the echo.
Calibration Techniques
Calibration ensures reliable results. Measure the speed of sound at your location’s temperature using the formula speed = 331.3 + 0.606 * temperature (°C) and update the code accordingly. For software adjustments, add a static offset to correct systematic errors. Hardware-wise, reposition the sensor for a direct line of sight and avoid angled surfaces that scatter the sound waves.
Conclusion
Using an ultrasonic sensor with Arduino involves three core steps: wiring the sensor, programming the microcontroller, and calibrating for accuracy. This project opens doors to various applications, from robot navigation to smart home devices. Don’t stop at the basics—experiment with integrating the sensor into alarm systems, automated doors, or weather monitoring. With a little creativity, you can push the boundaries of what ultrasonic sensing can achieve.
FAQs About Using Ultrasonic Sensors with Arduino
Q1: What is the maximum detection range of an HC-SR04 sensor?

Typically 2 cm to 400 cm, but accuracy decreases at longer distances due to weaker echoes and environmental interference.
Q2: Why does my ultrasonic sensor give incorrect readings?
Common issues include loose wiring, interference from multiple sensors, or improper code timing. Check connections and consider adding a timeout in the pulseIn() function.
Q3: Can I use an ultrasonic sensor outdoors?
Yes, but temperature and humidity variations can affect sound speed. Calibrate the sensor for outdoor conditions or use a model designed for rugged environments.

Q4: How do I interface multiple ultrasonic sensors with Arduino?
Assign each sensor to unique digital pins and modify the code to cycle through them in the loop. Ensure the sensors are spaced to avoid overlapping signals.
Q5: Can I use an ultrasonic sensor with other microcontrollers (Raspberry Pi, ESP32)?
Absolutely. While wiring and code syntax differ slightly, the core logic remains the same. Use GPIO libraries for Raspberry Pi or ESP32 to handle pin operations.


