
Table of Contents Show
Smart home devices are transforming the way we interact with everyday objects, bringing convenience, efficiency, and a touch of futuristic flair into our lives. One of the simplest yet most satisfying ways to experience this automation revolution is by building your own smart trash can. Imagine a trash bin that automatically detects your hand or an object near it and opens the lid without any physical contact—hygienic, fun, and impressively practical. In this project, we’ll guide you through creating a smart trash can using an Arduino and an ultrasonic sensor, perfect for beginners and tech enthusiasts alike. With just a few components and some simple coding, you’ll have a working prototype that demonstrates the power of embedded systems in daily life.
Historical Timeline
2020
Conceptualization and design phase.
2021
Prototype development with Arduino.
2022
Integration of ultrasonic sensor.
2023
Testing and refinement phase.
2024
Market launch and deployment.
Timeline infographic for Make a Smart Trash Can Using Arduino and Ultrasonic Sensor
Understanding the Components
Before diving into assembly, it’s essential to understand the core components of this project: the Arduino microcontroller and the ultrasonic sensor. These two elements work together to detect motion and trigger automated responses, forming the backbone of your smart trash can.
What is Arduino?
Arduino is an open-source electronics platform based on easy-to-use hardware and software. It’s widely used in DIY electronics projects due to its flexibility, affordability, and strong community support. At its core, an Arduino board reads inputs—like a sensor detecting proximity—and turns them into outputs—such as opening a lid or lighting an LED.
For this project, the Arduino Uno is the most suitable board, but alternatives like the Arduino Nano or Mega can also be used. The Uno is beginner-friendly, has sufficient digital I/O pins, and is compatible with most sensors and modules, including the ultrasonic sensor we’ll be using.
What is an Ultrasonic Sensor?
An ultrasonic sensor measures distance by emitting high-frequency sound waves and calculating the time it takes for them to bounce back after hitting an object. This principle, known as echolocation, is similar to how bats navigate in the dark.
The HC-SR04 is the most commonly used ultrasonic sensor in Arduino projects. It has four pins: VCC, Trig, Echo, and GND. The Trig pin sends out an ultrasonic pulse, while the Echo pin receives the reflected signal. By measuring the time between transmission and reception, the Arduino can calculate the distance to the nearest object with impressive accuracy—ideal for detecting a hand approaching the trash can.
Project Requirements
Building a smart trash can requires both hardware and software components. Gathering these in advance ensures a smooth and frustration-free experience.
Hardware Components
- Arduino Uno – The brain of the system that processes sensor data and controls outputs.
- HC-SR04 Ultrasonic Sensor – Detects the presence of a hand or object near the trash can.
- Servo Motor (optional) – Used to automatically open and close the trash can lid.
- Breadboard and Jumper Wires – For connecting components without soldering.
- LED (optional) – Acts as a visual indicator when the lid opens.
- Buzzer (optional) – Provides audible feedback when the sensor is triggered.
- Power Supply – Either USB cable or a 9V battery with a connector.
- Trash Can – A plastic bin with a lid that can be modified for sensor and motor mounting.
Software Requirements
- Arduino IDE – The official Integrated Development Environment used to write and upload code to the Arduino board. It’s free and available for Windows, macOS, and Linux.
- NewPing Library (optional) – A helpful library that simplifies ultrasonic sensor coding and improves accuracy.
To install the Arduino IDE, visit the official Arduino website, download the correct version for your operating system, and follow the installation instructions. Once installed, connect your Arduino via USB and select the correct board and port under the Tools menu.
Setting Up the Hardware
With all components ready, it’s time to connect them and prepare the physical setup of your smart trash can.
Connecting the Ultrasonic Sensor to Arduino
The HC-SR04 sensor connects directly to the Arduino using four jumper wires:
- Connect the VCC pin to the 5V pin on the Arduino.
- Connect the GND pin to one of the GND pins on the Arduino.
- Connect the Trig pin to digital pin 9 on the Arduino.
- Connect the Echo pin to digital pin 10 on the Arduino.
Ensure all connections are secure and double-check the pin labels to avoid damage. If you’re using additional components like a servo motor, connect its power and ground wires to the Arduino’s 5V and GND, and the signal wire to a PWM-enabled pin like pin 6.
Assembling the Smart Trash Can
Mount the ultrasonic sensor on the front or top edge of the trash can lid, pointing downward at a slight angle to detect hands approaching from the front. Use hot glue, double-sided tape, or a small bracket to secure it firmly.
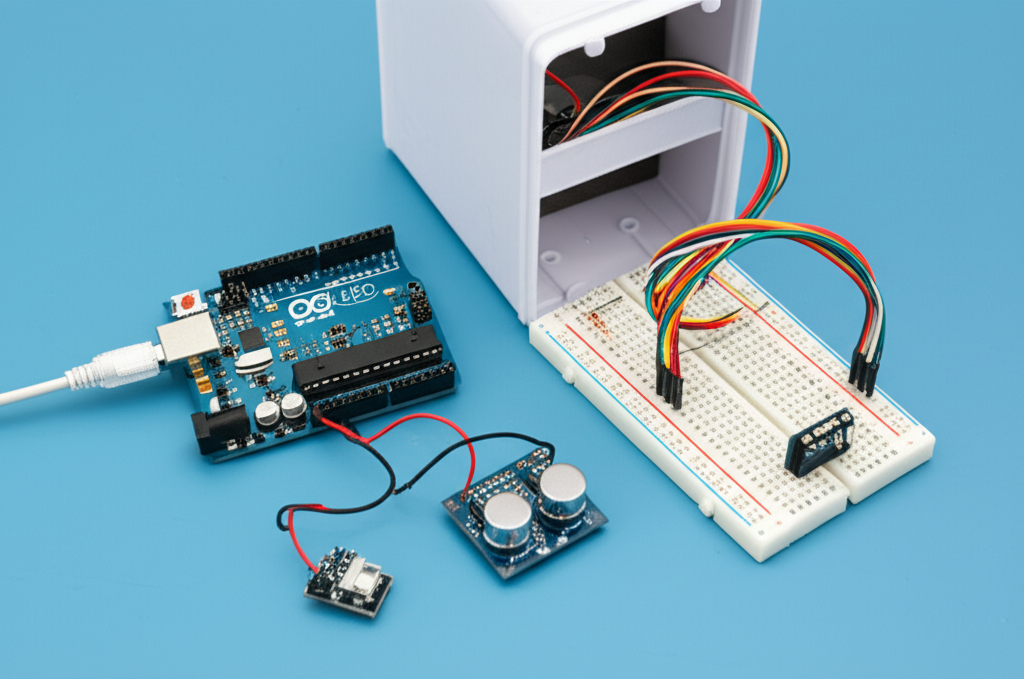
If using a servo motor, attach it so that its rotating arm can push or pull the lid open. A simple lever mechanism made from a plastic strip can link the servo to the lid. Make sure the sensor has a clear line of sight and isn’t obstructed by the lid or any internal structure. Test the range by placing your hand in front—the sensor should reliably detect motion within 10 to 30 centimeters.
Writing the Code
The code is what brings your smart trash can to life. It tells the Arduino how to interpret sensor data and when to trigger actions like opening the lid.
Understanding the Code Structure
An Arduino sketch consists of two main functions: setup() and loop(). The setup() function runs once when the board powers on and is used to initialize pins and sensors. The loop() function runs continuously, checking sensor values and responding accordingly.
For this project, we’ll use built-in functions like digitalWrite(), pulseIn(), and delay() to control the sensor and outputs. No external libraries are required, though using the NewPing library can improve sensor reliability.
Coding the Ultrasonic Sensor
Here’s a basic code snippet to read distance from the HC-SR04 sensor:
define TRIG_PIN 9
define ECHO_PIN 10


void setup() {
  pinMode(TRIG_PIN, OUTPUT);
  pinMode(ECHO_PIN, INPUT);
  Serial.begin(9600);
}

void loop() {
  long duration, distance;
  digitalWrite(TRIG_PIN, LOW);
  delayMicroseconds(2);
  digitalWrite(TRIG_PIN, HIGH);
  delayMicroseconds(10);
  digitalWrite(TRIG_PIN, LOW);
  duration = pulseIn(ECHO_PIN, HIGH);
  distance = duration * 0.034 / 2;

Serial.print("Distance: ");
  Serial.print(distance);
  Serial.println(" cm");

delay(100);
}
This code sends a pulse from the Trig pin, measures the echo return time, and calculates the distance in centimeters. The result is printed to the Serial Monitor, allowing you to verify sensor functionality.
Implementing the Smart Trash Can Logic
To automate the lid, integrate a servo motor and modify the code to open the lid when an object is within a set range—say, 20 cm:
includeServo myservo; define TRIG_PIN 9 define ECHO_PIN 10 define MAX_DISTANCE 20 void setup() { myservo.attach(6); pinMode(TRIG_PIN, OUTPUT); pinMode(ECHO_PIN, INPUT); } void loop() { long duration, distance; digitalWrite(TRIG_PIN, LOW); delayMicroseconds(2); digitalWrite(TRIG_PIN, HIGH); delayMicroseconds(10); digitalWrite(TRIG_PIN, LOW); duration = pulseIn(ECHO_PIN, HIGH); distance = duration * 0.034 / 2; if (distance <= MAX_DISTANCE) { myservo.write(90); // Open lid delay(3000); // Keep open for 3 seconds } else { myservo.write(0); // Close lid } delay(100); }
This version controls the servo to open the lid when a hand is detected and closes it after a delay. You can customize the angle and timing based on your lid mechanism.
Testing and Debugging
Once the hardware and code are ready, it's time to test the entire system.
Testing the System
Upload the code to your Arduino and place your hand in front of the sensor. The lid should open automatically. If using an LED or buzzer, verify that they activate as expected.
Common issues include inconsistent sensor readings, motor not moving, or no response at all. Ensure all wires are securely connected, the servo is receiving enough power, and the sensor isn’t facing reflective or soft surfaces that may interfere with readings.
Debugging Tips
Use the Serial Monitor to view real-time distance values. This helps identify if the sensor is working or if the readings are erratic. If the values fluctuate, try adding a small delay or averaging multiple readings.
Check for loose connections, incorrect pin assignments, or insufficient power—especially when driving motors. If the servo jitters, ensure it’s not drawing too much current from the Arduino; consider using an external power source for better stability.
Enhancing the Smart Trash Can
Once the basic version works, you can expand its capabilities and make it even smarter.
Adding Additional Features
Consider integrating Wi-Fi using an ESP32 or ESP8266 module to enable remote monitoring or mobile app control. You could receive notifications when the bin is full or control the lid via a smartphone.
Other upgrades include adding an LCD display to show bin status, a weight sensor to monitor fill level, or motion-activated lighting inside the bin for better visibility at night.
Improving Efficiency and Reliability
To improve performance, calibrate the sensor’s detection range to avoid false triggers from pets or passing movements. Use a capacitor across the servo’s power pins to reduce electrical noise.
For battery-powered setups, implement sleep modes and reduce polling frequency to extend battery life. Enclose the electronics in a protective case to prevent dust and spills from damaging the components.
Conclusion
Building a smart trash can with an Arduino and ultrasonic sensor is a rewarding project that blends practicality with innovation. It demonstrates how simple components can be combined to create intelligent, automated solutions for everyday problems. From improving hygiene to sparking interest in electronics, this project offers both functional benefits and educational value. Whether you're a beginner exploring the world of Arduino or a hobbyist looking for a fun weekend build, this smart trash can is a great starting point. So gather your components, fire up the Arduino IDE, and take the first step toward a smarter home. The future of automation starts with projects like this—one bin at a time.
FAQ
Can I use a different Arduino board for this project?
Yes, you can use other Arduino-compatible boards such as the Nano, Mega, or even ESP32, as long as they have sufficient digital I/O pins and support the required peripherals like servos and sensors.
What if the ultrasonic sensor doesn't work?
First, check all wiring connections and ensure the sensor is receiving proper power. Use the Serial Monitor to view raw distance data and verify signal transmission. If issues persist, test the sensor on a known working setup or replace it if faulty.
How can I make the smart trash can more user-friendly?
Consider adding a manual override button, an LED indicator for status, or integrating voice control via platforms like Alexa or Google Assistant using Wi-Fi-enabled boards.
Can I use this project for other automation tasks?
Absolutely. The same principles apply to automated doors, security alarms, parking sensors, and hands-free faucets. The ultrasonic sensor and Arduino combination is versatile and widely applicable.
Where can I find more resources for Arduino projects?
The official Arduino website (arduino.cc) offers extensive tutorials, forums, and project guides. Online platforms like Instructables, Hackster.io, and GitHub also host thousands of open-source Arduino projects to inspire your next build.