Table of Contents Show
Have you ever wondered how security systems detect movement in the dark or how smart lights turn on when someone enters a room? The answer often lies in a combination of a Passive Infrared (PIR) sensor and an Arduino microcontroller. This powerful duo offers a cost-effective, easy-to-build solution for motion detection, making it a favorite among hobbyists, educators, and DIY enthusiasts. Whether you’re looking to automate lighting, enhance home security, or create an IoT-enabled wildlife tracker, a PIR and Arduino system provides endless possibilities. Let’s dive into how this technology works and how you can create your own motion detection project.
Historical Timeline
2010
PIR sensors become widely available for DIY electronics projects.
2015
Arduino Uno gains popularity for motion detection prototypes.
2018
Open-source PIR sensor libraries simplify Arduino integration.
2022
Smart home automation integrates PIR-based security systems.
2025
AI-enhanced PIR systems improve motion detection accuracy.
Timeline infographic for Motion Detection System Using Pir Sensor and Arduino
Understanding the PIR Sensor and Arduino Motion Detection System
What is a PIR Sensor?
A PIR sensor detects motion by measuring changes in infrared radiation emitted by objects in its field of view. When a person or animal moves within range, the sensor picks up fluctuations in heat patterns, triggering a signal. These sensors are widely used due to their affordability, low power consumption, and reliability in both indoor and outdoor environments.
Role of Arduino in Motion Detection
Arduino acts as the intelligent controller in this setup, processing signals from the PIR sensor and deciding when to activate outputs like LEDs or alarms. Its compatibility with various sensors and user-friendly programming environment make it ideal for beginners and experts alike. With just a few lines of code, you can teach the Arduino to interpret motion data and respond accordingly.
Why Build This System?
Combining a PIR sensor with Arduino allows you to create a tailored solution for security, automation, or environmental monitoring. The project is excellent for learning electronics fundamentals, such as input/output handling and logic programming. Plus, it’s a stepping stone to integrating advanced features like wireless communication or cloud-based alerts.
Components and Tools Required
Hardware Components
- Arduino Board: Uno or Nano is recommended for simplicity and accessibility.
Software Tools
The Arduino Integrated Development Environment (IDE) is essential for writing and uploading code. Download it from arduino.cc and install it on your computer. No special libraries are needed for basic motion detection, as the PIR sensor functions with standard digital input/output commands.
Step-by-Step Guide to Building the System
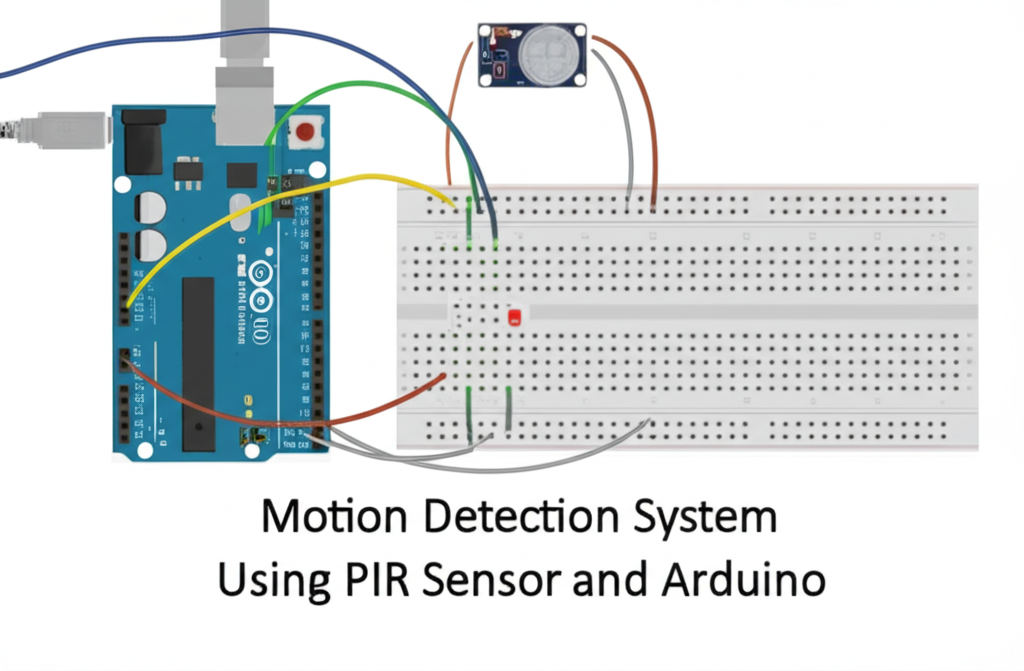
Connecting the PIR Sensor to Arduino
Wire the PIR sensor to the Arduino as follows: connect VCC to 5V, GND to a ground pin, and the signal pin to a digital input (e.g., D2). Use jumper wires to ensure stable connections and organize them neatly to avoid short circuits. Double-check polarity and pin alignment before powering the system.
Setting Up the Arduino IDE
Launch the Arduino IDE after installation and select the correct board (e.g., Arduino Uno) and port under the Tools menu. A simple sketch written in C-like syntax will allow you to read sensor values and control outputs. The IDE also provides a serial monitor for real-time debugging and testing.
Writing the Motion Detection Code
The core code uses pinMode to set the signal pin as an input and digitalRead to capture sensor states. An if/else loop checks if the sensor detects motion (HIGH) and activates an LED or buzzer. Upload the code via USB, and the Arduino will immediately process motion data.

Testing the System
After uploading the code, allow the PIR sensor to stabilize for 10-30 seconds. Wave your hand in front of the sensor to test detection. If the LED flickers or the buzzer sounds inconsistently, adjust the sensor’s sensitivity using the onboard potentiometer or tweak code delays for better performance.

How the Motion Detection System Works
The Science Behind PIR Sensors
PIR sensors rely on pyroelectric elements that generate a charge when exposed to infrared radiation. They detect motion by identifying sudden changes in heat distribution, such as a human entering a room. Sensitivity and detection range can be adjusted via the sensor’s physical settings or software logic.
Arduino’s Role in Processing Sensor Data
Arduino continuously reads the PIR sensor’s output and applies conditional logic to determine if motion is present. For example, if the sensor returns a HIGH signal lasting longer than 500 milliseconds, the system can activate an alarm. This real-time processing enables precise control and customization.
Output Integration and Automation
Basic outputs like LEDs or buzzers are easy to implement. For automation, connect relays to control lamps, fans, or smart locks. Advanced users can integrate the system with Wi-Fi modules to send alerts via email or SMS, turning it into a connected IoT device.
Enhancing the System
Increasing Detection Range
Adjust the PIR sensor’s onboard potentiometers to fine-tune sensitivity and range. In code, you can also modify delay times to avoid rapid false triggers. Placing the sensor at an optimal height and angle improves accuracy in larger spaces.
Adding IoT Capabilities
Pair the Arduino with an ESP8266 module to enable Wi-Fi connectivity. Use platforms like Blynk or IFTTT to receive real-time notifications on smartphones or web apps. This upgrade transforms the system into a smart home component or remote security tool.
Power Management
For portable projects, use a 9V battery or rechargeable lithium-ion pack. Implement sleep modes in the code using libraries like SleepyDog to reduce power consumption. This makes the system suitable for wildlife monitoring or remote installations.
Applications of the Motion Detection System
Home Security and Theft Prevention
Mount the sensor near entry points to trigger alarms or lights when unauthorized movement is detected. Combine it with a camera module to capture footage automatically, creating an affordable surveillance solution.
Smart Home Automation
Program the system to turn on lights or fans when someone enters a room, saving energy and improving convenience. Add multiple sensors to control different zones or integrate with smart home platforms like Home Assistant for centralized management.

Wildlife Monitoring and Pest Control
Deploy the system in outdoor areas to track animal activity or detect pests. Use a data logger to record motion events or connect to a server for remote analysis. This is particularly useful for garden monitoring or research projects.
Office and Industrial Use Cases
In commercial spaces, the system can automate lighting and HVAC control to reduce electricity costs. In factories, it can monitor restricted zones or track equipment usage, enhancing safety and operational efficiency.
Troubleshooting Common Issues
False triggers from pets or sudden temperature shifts can be minimized by adjusting the sensor’s field of view with physical barriers or increasing the delay in the code. If the sensor fails to detect motion, verify wiring and ensure no interference from heat sources or direct sunlight. Logic errors in the code often stem from incorrect pin assignments or timing issues, so review the sketch carefully.
Conclusion
Building a motion detection system with a PIR sensor and Arduino is a rewarding project that blends practicality with learning. Its simplicity allows for quick setup, while its adaptability invites endless upgrades, from IoT connectivity to multi-sensor arrays. Whether you’re securing a home, automating a workspace, or exploring electronics, this system proves that innovation can start with just a few components. Experiment with additional features like LCD displays, data logging, or mobile alerts to expand your project’s potential.
FAQ
How Does a PIR Sensor Detect Motion?
PIR sensors detect motion by sensing changes in infrared radiation caused by warm bodies. A pyroelectric sensor inside the module reacts to these changes, generating an electrical signal when movement is detected.
Can This System Work in Complete Darkness?
Yes, PIR sensors rely on infrared radiation (heat) rather than visible light. This allows them to function effectively in total darkness, making them perfect for night-time security or monitoring tasks.
How to Adjust the PIR Sensor’s Sensitivity?
Most PIR modules have an onboard potentiometer for manual sensitivity adjustment. In code, you can add delays between motion detections or filter out short bursts of signal to reduce noise.
What Are the Power Requirements for the Setup?
The Arduino typically requires 5V via USB or a 9V battery, while the PIR sensor operates on the same supply. For extended use, consider a 5000mAh lithium battery with sleep mode programming to conserve energy.
How to Reduce False Alarms from Pets or Small Movements?
Use a physical shield to narrow the sensor’s field of view, avoid areas with frequent small movements, and add a software delay of 1-2 seconds after detection to ensure sustained motion. These steps significantly improve accuracy.


